
- Posted on
- By Harmonyrecipes
- In Beef Recipes
- Leave a comment
The Ultimate Baked Ziti Recipe: Comfort Food That Brings Everyone to the Table
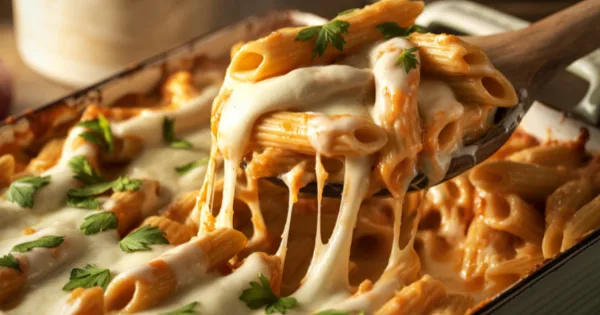
Picture this: It’s Sunday evening, and golden light streams through your kitchen window as you pull a bubbling casserole from the oven. The cheese stretches in those perfect, Instagram-worthy strands, and the aroma—that intoxicating blend of tomatoes, garlic, and melted cheese—has already drawn your family from every corner of the house. This isn’t just dinner. This is the kind of moment that becomes a treasured memory.
Your grandmother probably had a version of this dish. Maybe your best friend brings it to every potluck. There’s a reason baked ziti has earned its place in the comfort food hall of fame. It’s the dish that shows up when someone moves into a new home, when a family welcomes a baby, or when you simply want to wrap your loved ones in warmth and flavor.
Today, you’re going to master a baked ziti recipe that delivers restaurant-quality results without the complexity or expense. Whether you’re feeding picky eaters on a Tuesday night or hosting a crowd for game day, this recipe has your back.
Table of Contents
What Makes This Baked Ziti Recipe Stand Out From the Rest
You’ve probably encountered dozens of pasta casserole recipes, so what makes this one worth your time? Let’s break it down.
The Three-Layer Secret That Changes Everything
Most home cooks simply toss pasta with sauce and cheese, then bake it. That works, sure, but it doesn’t create the experience you’re after. This baked ziti recipe uses a strategic layering technique that ensures every single forkful delivers the perfect balance. You’ll get:
- Creamy ricotta that melts into each bite
- Savory meat sauce with deep, complex flavors
- That glorious cheese pull that makes everyone reach for their phones
- Perfectly cooked pasta that holds its shape
The three-cheese combination isn’t random either. Ricotta brings creaminess and helps bind everything together. Mozzarella provides that stretchy, melty quality everyone craves. Parmesan adds a sharp, salty punch that cuts through the richness and elevates the entire dish.
Why Families Keep Coming Back to This Recipe
Your schedule is packed. Between work deadlines, school activities, and everything else demanding your attention, you need recipes that work with your life, not against it. This baked ziti recipe checks all those boxes:
- Serves 8-10 people generously, perfect for entertaining or meal prepping
- Budget-friendly ingredients that won’t shock your wallet
- Leftovers taste better the next day as flavors meld and deepen
- Kid-approved yet sophisticated enough for adult palates
- Make-ahead friendly so you can prep when convenient
Essential Ingredients for Your Perfect Baked Ziti Recipe
Before you start cooking, let’s talk about what you’ll need. Quality matters, but you don’t need to source imported Italian specialty products to make this work beautifully.
Complete Ingredient List with Measurements
The Pasta Foundation
Ingredient | Quantity | Notes |
|---|---|---|
Ziti pasta (or penne) | 1 pound | Tube-shaped pasta works best |
Salt for pasta water | 2 tablespoons | Makes pasta flavorful from within |
The Sauce Components
Ingredient | Quantity | Notes |
|---|---|---|
Olive oil | 2 tablespoons | For sautéing |
Ground beef or Italian sausage | 1 pound | Or use half of each |
Yellow onion, diced | 1 medium | Adds sweetness and depth |
Garlic cloves, minced | 4 cloves | Fresh is essential |
Marinara sauce | 32 oz (1 jar) | Or homemade |
Crushed tomatoes | 28 oz (1 can) | For extra body |
Tomato paste | 2 tablespoons | Intensifies tomato flavor |
Italian seasoning | 2 teaspoons | Oregano, basil, thyme blend |
Red pepper flakes | ½ teaspoon | Optional, for heat |
Fresh basil | ¼ cup, chopped | Bright, fresh flavor |
Salt and black pepper | To taste | Season each layer |
The Cheese Trio
Ingredient | Quantity | Notes |
|---|---|---|
Ricotta cheese | 15 oz (1 container) | Full-fat for best texture |
Mozzarella cheese, shredded | 3 cups (divided) | Use 2 cups mixed in, 1 cup on top |
Parmesan cheese, grated | 1 cup | Freshly grated preferred |
Egg | 1 large | Binds the ricotta mixture |
Smart Substitutions for Dietary Needs
Can’t find an ingredient or need to accommodate dietary restrictions? Here are your best alternatives:

For Vegetarian Baked Ziti:
- Skip the meat entirely
- Add 2 cups sautéed mushrooms for umami depth
- Include 1 cup each: diced zucchini, bell peppers, and fresh spinach
- Consider adding 1 cup diced eggplant for heartiness
For Lighter Versions:
- Substitute ground turkey for beef (saves about 80 calories per serving)
- Use part-skim ricotta and mozzarella (reduces fat by 30%)
- Replace half the pasta with spiralized zucchini
- Choose chicken sausage instead of pork sausage
For Gluten-Free Adaptation:
- Use certified gluten-free pasta (add 2 minutes to cooking time)
- Ensure your marinara sauce is gluten-free certified
- Check all seasoning blends for hidden gluten
For Dairy-Free Requirements:
- Replace ricotta with cashew cream cheese
- Use dairy-free mozzarella alternatives
- Substitute nutritional yeast for Parmesan (adds cheesy flavor)
Step-by-Step Instructions for the Perfect Baked Ziti Recipe
Phase 1: Preparing Your Components (30 minutes)
Step 1: Cook the Pasta to Al Dente Perfection
Bring a large pot of water to a rolling boil—you’ll need at least 6 quarts for one pound of pasta. Add two tablespoons of salt. Yes, that seems like a lot, but this is your only chance to season the pasta from within.
Drop in your ziti and set a timer for exactly two minutes less than the package directions suggest. For most brands, this means cooking for 8-9 minutes instead of 10-11.
Why undercook it? Your pasta continues cooking during the 45-minute baking process. If you cook it to perfect tenderness now, it’ll turn mushy and overcooked in the oven. You want it to still have a slight firmness in the center.
Drain your pasta thoroughly in a colander and give it a light toss with a drizzle of olive oil. This prevents the pieces from welding themselves together into one giant pasta mass while you prepare everything else.
Step 2: Build Your Rich, Flavorful Meat Sauce
Heat two tablespoons of olive oil in your largest skillet over medium-high heat. Once the oil shimmers, add your ground meat. Use a wooden spoon to break it apart into small crumbles.
Here’s a crucial tip: resist the urge to stir constantly. Let the meat sit undisturbed for 2-3 minutes at a time. This allows it to develop a deep brown crust—those caramelized bits add incredible savory depth. Continue breaking apart and browning for 6-8 minutes total until no pink remains.
Add your diced onion directly to the meat. The fat released from the browning process will help your onion soften and sweeten. Cook for five minutes, stirring occasionally, until the onion turns translucent and develops golden edges.
Now add your minced garlic and stir constantly for exactly one minute. Garlic burns easily, turning bitter and acrid, so keep it moving. You’ll know it’s ready when the aroma hits you and makes your mouth water.
Pour in your marinara sauce, crushed tomatoes, and tomato paste. Add your Italian seasoning, a generous pinch of salt, black pepper, and red pepper flakes if you’re using them. Stir everything together until well combined.
Reduce your heat to low and let this simmer gently for 15-20 minutes. Stir every few minutes to prevent sticking. This simmering time allows flavors to marry and intensify while the sauce thickens to the perfect consistency.
During the last five minutes of simmering, stir in your fresh basil. Adding it late preserves that bright, herbal quality that fades with prolonged heat.
Step 3: Create Your Creamy Ricotta Mixture
While your sauce simmers, grab a large bowl and combine:
- 15 ounces ricotta cheese
- 1 cup shredded mozzarella
- ½ cup grated Parmesan
- 1 beaten egg
Mix with a fork or spatula until smooth and uniform—no streaks of egg should remain. Season this mixture generously with salt, pepper, and a pinch of Italian seasoning.
Why this step matters: Unseasoned ricotta creates a bland middle layer that disappoints. Proper seasoning and the egg binding ensure your cheese layer holds together beautifully instead of turning watery.
Phase 2: Assembling Your Masterpiece (10 minutes)
Preheat your oven to 375°F. Position a rack in the center of your oven for even heat distribution.
Grab a 9×13 inch baking dish and spray it generously with cooking spray, making sure to coat the sides as well as the bottom.
Now you’re ready to build layers:
- Bottom layer: Spread about one-third of your meat sauce across the bottom of the dish. This prevents pasta from sticking and ensures every layer has sauce.
- First pasta layer: Add half of your cooked ziti, spreading it evenly across the sauce.
- Cheese layer: Dollop your ricotta mixture across the pasta in large spoonfuls. Don’t worry about perfect coverage—gently spread it with the back of your spoon. You’re not frosting a cake here; a rustic approach works beautifully and ensures some pasta gets coated while leaving texture.
- Mozzarella layer: Sprinkle one cup of shredded mozzarella evenly over the ricotta.
- Second pasta layer: Add your remaining ziti, spreading it to create an even surface.
- Sauce topping: Cover the pasta completely with the rest of your meat sauce, making sure to reach the edges.
- Final cheese crown: Sprinkle your last cup of mozzarella evenly across the top, then scatter the remaining half cup of Parmesan over everything.
Phase 3: The Baking Process (45 minutes)
Cover your dish tightly with aluminum foil. Pro tip: Spray the underside of your foil with cooking spray first. This prevents the melted cheese from sticking to the foil and getting torn away when you remove it later.
Slide your covered dish into your preheated oven and bake for 30 minutes. This covered phase allows:
- The pasta to finish cooking through completely
- The cheeses to melt into silky, gooey perfection
- All the flavors to meld together harmoniously
- Steam to build up, keeping everything moist
After 30 minutes, carefully remove the foil (watch out for hot steam!) and return the dish to the oven for 15 more minutes uncovered. This uncovered phase creates that golden, slightly crispy cheese topping everyone fights over.
How to know it’s perfectly done:
- The edges bubble vigorously
- The cheese develops beautiful golden-brown spots
- A knife inserted in the center comes out hot to the touch
- The internal temperature reaches 165°F
Here’s where patience pays serious dividends: let your baked ziti rest for 10-15 minutes before serving. This cooling period allows the layers to set up properly. If you cut into it immediately, you’ll have a saucy mess on your plates instead of defined, beautiful portions that hold their shape.
Expert Tips That Elevate Your Baked Ziti Recipe
Want to take your dish from good to extraordinary? These insider techniques make all the difference.
Professional Secrets for Superior Results
Season as you build: Don’t wait until the end to taste and adjust. Season your meat while it browns, adjust your sauce before simmering, and season your cheese mixture separately. This creates layers of flavor depth that you simply can’t achieve by adding salt at the table.
Shred your own cheese: Those convenient pre-shredded bags contain anti-caking agents (usually cellulose or potato starch) that prevent proper melting. Shredding your own cheese takes three minutes and transforms your results. The cheese melts smoother, stretches better, and tastes fresher.
Add textural contrast: Mix half a cup of panko breadcrumbs with two tablespoons of melted butter. During those final 15 uncovered minutes, sprinkle this mixture over your cheese. It creates a golden, crunchy topping that professional chefs use to make dishes more interesting and restaurant-worthy.
Use quality marinara: Your sauce provides the flavor foundation. Choose a marinara you’d actually enjoy eating with a spoon. Check the ingredient list—it should list tomatoes first, followed by olive oil, garlic, and herbs, not sugar and artificial flavors.
Common Mistakes to Avoid
Don’t skip the pasta water salt: Under-seasoned pasta tastes flat no matter how flavorful your sauce is. That heavily salted boiling water is your only opportunity to season the pasta from within.
Avoid over-mixing the ricotta: Once your egg is incorporated and everything’s uniform, stop mixing. Over-mixing can make the ricotta grainy instead of creamy.
Don’t use a pan that’s too small: If your 9×13 inch dish is overflowing, split the mixture between two smaller dishes. Overcrowding prevents proper heat circulation and results in uneven cooking.
Never skip the resting time: This is perhaps the most violated rule in pasta casserole cooking. That 10-15 minute rest transforms your dish from soupy to sliceable.
Planning Ahead with Your Baked Ziti Recipe
Life gets hectic, and that’s where this recipe really shines. The make-ahead flexibility means you can prep during your free time and bake when you need it.
Make-Ahead Options That Actually Work
Option 1: Assemble and Refrigerate (up to 24 hours ahead)
- Complete the entire assembly process
- Cover tightly with plastic wrap, then aluminum foil
- Refrigerate until ready to bake
- Before baking, let it sit at room temperature for 30 minutes
- Add 10-15 minutes to your covered baking time since you’re starting from cold
Option 2: Freeze for Later (up to 3 months)
- Assemble everything in a freezer-safe, oven-safe dish
- Wrap tightly in plastic wrap, then cover completely with aluminum foil
- Label with the date and baking instructions
- To bake from frozen: Don’t thaw. Bake covered at 350°F for 1 hour, then uncovered for 30 minutes
- To bake from thawed: Thaw overnight in refrigerator, then follow standard baking instructions
Storing and Reheating Leftovers Properly
Refrigerator Storage (3-4 days):
- Let the baked ziti cool completely before covering (this prevents condensation)
- Store in airtight containers or wrap the entire dish tightly
- Reheat individual portions in the microwave for 2-3 minutes on 70% power
- Reheat the full dish covered at 350°F for 20-25 minutes
Freezer Storage (2-3 months):
- Portion into individual servings for easy weekday lunches
- Wrap each portion in plastic wrap, then aluminum foil
- Label clearly with contents and date
- Thaw overnight in the refrigerator before reheating
- Add a splash of water or extra sauce when reheating to prevent drying
Delicious Variations of the Classic Baked Ziti Recipe
Once you’ve mastered the basic version, these variations keep things exciting without requiring you to learn an entirely new recipe.
Creative Twists Worth Trying
Four-Cheese Baked Ziti: Add 1 cup fontina and ½ cup provolone to your cheese mixture. The result is incredibly creamy and rich—perfect for special occasions or when you want to really impress someone.
Spicy Italian Version:
- Use all hot Italian sausage instead of ground beef
- Double the red pepper flakes to 1 teaspoon
- Add ½ cup sliced pepperoncini to the sauce
- Top with extra Parmesan for a salty-spicy contrast
Vegetable-Packed Baked Ziti:
- Sauté 2 cups mixed vegetables (zucchini, bell peppers, mushrooms, spinach)
- Layer the vegetables with your ricotta mixture
- Add 1 cup diced eggplant to the sauce for extra heartiness
- This version adds nutrients while keeping the comfort food appeal
Chicken Alfredo Baked Ziti:
- Replace marinara with 3 cups Alfredo sauce
- Add 2 cups diced, cooked chicken breast
- Use only white cheeses (mozzarella, Parmesan, fontina)
- Add ½ teaspoon nutmeg to the ricotta mixture
Meatball Baked Ziti:
- Replace ground meat with 20-24 small Italian meatballs, sliced in half
- Arrange meatball halves throughout the layers
- This adds visual interest and fun texture variation
What to Serve with Your Baked Ziti Recipe
Rounding out your meal with complementary sides creates a complete Italian feast experience.
Perfect Accompaniments
Salads that balance richness:
- Classic Caesar with crisp romaine and homemade croutons
- Simple mixed greens with lemon vinaigrette
- Caprese salad with fresh mozzarella, tomatoes, and basil
- Arugula salad with shaved Parmesan and balsamic glaze
Bread options:
- Garlic bread brushed with herb butter
- Focaccia with rosemary and sea salt
- Crusty Italian bread for soaking up sauce
- Cheesy breadsticks for the kids (and adults!)
Vegetable sides:
- Roasted broccoli with lemon and Parmesan
- Sautéed green beans with garlic
- Grilled asparagus with balsamic reduction
- Roasted Brussels sprouts with pancetta
Creating a Complete Italian Menu
For a dinner party:
- Appetizer: Antipasto platter with olives, cured meats, cheeses, and marinated vegetables
- Main: Your perfect baked ziti recipe
- Side: Garlic bread and Caesar salad
- Dessert: Tiramisu or cannoli
- Beverage: Medium-bodied Italian red wine (Chianti or Montepulciano)
Nutritional Information for Your Baked Ziti Recipe
Understanding what you’re eating helps you make informed choices about portions and how this fits into your overall meal plan.
Per Serving Breakdown (based on 10 servings)
Nutrient | Amount Per Serving |
|---|---|
Calories | 520 |
Protein | 32g |
Carbohydrates | 45g |
Fat | 22g |
Saturated Fat | 11g |
Fiber | 4g |
Sugar | 7g |
Sodium | 890mg |
Calcium | 380mg |
Iron | 3.2mg |
Note: Nutritional values are estimates and will vary based on specific brands and ingredient choices you make.
Making It Healthier Without Sacrificing Flavor
If you’re watching calories or trying to boost nutrition, try these modifications:
Reduce calories:
- Use ground turkey instead of beef (saves approximately 80 calories per serving)
- Choose part-skim cheeses (reduces about 60 calories per serving)
- Increase vegetable content to add bulk without many calories
- Use whole wheat pasta for added fiber and nutrients
Boost protein:
- Add white beans to the sauce
- Use extra-lean ground beef (93/7 ratio)
- Include turkey sausage for additional protein
Lower sodium:
- Use no-salt-added crushed tomatoes
- Make your own marinara sauce to control salt content
- Choose low-sodium cheese options where available
- Reduce added salt and rely on herbs for flavor
Frequently Asked Questions About Baked Ziti Recipe
What’s the difference between baked ziti and lasagna?
While both are beloved Italian-American baked pasta dishes, they differ significantly in preparation and texture. Baked ziti uses tube-shaped pasta (ziti, penne, or rigatoni) that you mix with sauce and cheese before layering. Lasagna requires flat noodles arranged in precise layers with sauce, cheese, and sometimes meat between each sheet.
Baked ziti is considerably easier and more forgiving for home cooks. You don’t need to worry about noodles overlapping perfectly or layers sliding apart when you cut it. The tube pasta creates pockets that trap sauce and cheese, giving you flavor in every bite. Think of baked ziti as lasagna’s more casual, weeknight-friendly cousin.
Can I make this baked ziti recipe without ricotta cheese?
Absolutely! Several substitutions work beautifully. Cottage cheese is the most common replacement—just drain any excess liquid first and blend it smooth if you prefer a creamier texture. The flavor is slightly tangier but most people can’t tell the difference once it’s baked.
Another option is creating a simple béchamel (white sauce) by melting 3 tablespoons butter, whisking in 3 tablespoons flour, then gradually adding 2 cups milk while stirring constantly. Season with salt, pepper, and nutmeg. This creates a creamy layer without any cheese at all.
Some recipes skip the ricotta layer entirely and just use mozzarella and Parmesan throughout. This creates a simpler but still delicious version that’s perfect when you’re short on time or ingredients
How do I prevent my baked ziti recipe from being dry?
Dry baked ziti usually results from one of four issues, all easily fixable:
Not enough sauce: Your pasta should look generously coated when you mix it. If it seems dry before baking, it’ll be worse after. Use the full amount of sauce in the recipe, and don’t be shy about adding an extra cup of marinara if your pasta seems thirsty.
Overcooking the pasta initially: Remember, your pasta continues cooking in the oven. If you cook it to perfect tenderness before baking, it’ll become overdone and absorb too much liquid, leaving your dish dry.
Skipping the foil cover: That aluminum foil tent during the first 30 minutes traps steam and moisture. Baking uncovered the entire time allows too much liquid to evaporate.
Not letting it rest: Cutting into your baked ziti immediately after removing it from the oven means the sauce hasn’t had time to settle back into the pasta. That 10-15 minute rest allows everything to redistribute properly.
Can I use a different pasta shape for this baked ziti recipe?
Yes! Any tube-shaped pasta that can hold sauce inside works perfectly. Penne is probably the most common substitution—it’s essentially just shorter ziti. Rigatoni, with its larger diameter and ridged exterior, is another excellent choice that grabs even more sauce.
Mostaccioli works well too, though it’s smoother on the outside. Even large shells (not the jumbo stuffing kind, but the medium-sized ones) create interesting texture because sauce gets trapped inside each shell.
Avoid long pasta like spaghetti, linguine, or fettuccine—they don’t create the same experience. Also skip tiny shapes like orzo or ditalini, which turn mushy. Stick with substantial, tube-shaped pasta that’s between 1-2 inches long for the best results.
Why is my baked ziti watery or soupy?
Several culprits cause watery baked ziti, but the good news is they’re all preventable:
Wet pasta: After draining your cooked pasta, let it sit in the colander for a minute or two, shaking it occasionally. Those tubes trap water inside, and that water dilutes your sauce during baking.
Watery ricotta: Some brands have more liquid than others. If your ricotta seems runny, place it in a fine-mesh strainer over a bowl for 15 minutes before using. This drains excess whey and concentrates the flavor.
Too much sauce: More isn’t always better. The recipe provides the right sauce-to-pasta ratio. Extra sauce just pools at the bottom instead of clinging to the pasta.
Skipping the rest period: This is crucial! That 10-15 minute rest after baking allows the cheese to firm up slightly and the sauce to thicken. Cutting immediately releases all the hot liquid.
Frozen vegetables: If you’re adding vegetables, sauté them first to drive off moisture. Frozen vegetables especially release a lot of water during baking if you don’t cook them first.
How long does baked ziti last in the refrigerator?
Properly stored baked ziti will last 3-4 days in your refrigerator. Make sure it cools completely before covering—covering while still hot creates condensation that can make it soggy and promotes bacterial growth.
Transfer leftovers to an airtight container or wrap your baking dish tightly with plastic wrap. Many people report that the flavors actually improve on day two as they meld together overnight.
After four days, quality starts declining even though it might technically still be safe. The pasta absorbs more liquid, the texture gets softer, and the fresh flavor diminishes. If you won’t finish it within four days, freeze portions instead
Can I make this baked ziti recipe in a slow cooker?
You can, though the texture will be different from oven-baked. Here’s how to adapt it:
Cook your pasta to al dente and drain it thoroughly. Brown your meat and prepare your sauce on the stovetop as directed. Spray your slow cooker with cooking spray, then layer pasta, cheese mixture, and sauce just as you would in a baking dish.
Cook on low for 3-4 hours. Don’t lift the lid during the first 3 hours—you’ll release steam and extend cooking time. The texture will be softer and creamier than oven-baked, without that golden, crispy top layer.
For a compromise approach, assemble everything in your slow cooker and cook on low, then transfer to a broiler-safe dish for 5 minutes under the broiler to create that golden cheese topping.
What’s the best way to reheat baked ziti without drying it out?
For individual portions in the microwave: Place your serving on a microwave-safe plate. Add a tablespoon of water or extra marinara sauce. Cover with a damp paper towel or microwave-safe lid. Heat on 70% power for 2-3 minutes, checking halfway through. The reduced power and added moisture prevent the edges from drying out while the center heats through.
For the full dish in the oven: Preheat your oven to 350°F. Add ¼ cup water or marinara sauce to the dish and gently mix the top layer to incorporate moisture. Cover tightly with aluminum foil. Bake for 20-25 minutes until heated through (internal temperature of 165°F). Remove the foil for the last 5 minutes if you want to re-crisp the cheese topping.
Pro tip: Slightly underbaking your initial bake by 5 minutes makes reheating more forgiving, especially if you know you’ll be eating leftovers all week.
Can I add vegetables to my baked ziti recipe?
Definitely! Vegetables add nutrition, color, and texture variety. The key is preparing them correctly so they don’t release too much water and make your dish soupy.
Best vegetables to add:
- Spinach (fresh or frozen, squeezed dry)
- Mushrooms (sauté first to release moisture)
- Zucchini (slice thin, sauté, then drain on paper towels)
- Bell peppers (dice small, sauté until softened)
- Eggplant (dice, salt, drain, then sauté)
- Broccoli florets (blanch first, then chop small)
How to incorporate them: Sauté your chosen vegetables in olive oil with a pinch of salt until they’re about 80% cooked. Let them cool slightly, then either mix them into your sauce or create a vegetable layer between your ricotta and pasta layers.
For leafy greens like spinach, squeeze out ALL the water after cooking—this is crucial. Those greens hold an amazing amount of liquid that will ruin your texture if not removed.
Is it necessary to cover baked ziti with foil while baking?
Yes, for most of the baking time, covering is essential. Here’s why it matters:
The foil cover during the first 30 minutes creates a steamy environment inside your baking dish. This steam:
- Helps the pasta finish cooking through
- Melts the cheese layers thoroughly
- Prevents the top from browning too quickly before the center heats through
- Keeps moisture inside the dish instead of evaporating away
Removing the foil for the final 15 minutes allows the top layer of cheese to brown, bubble, and develop those delicious golden spots everyone loves. It also lets some moisture evaporate, concentrating flavors and preventing a soupy texture.
Think of it like a two-phase cooking process: covered for even, gentle cooking; uncovered for that perfect golden finish.
Conclusion: Making Memories with Your Baked Ziti Recipe
You’ve now got everything you need to create a baked ziti that brings people together around your table. This isn’t just about following a recipe—it’s about creating moments that matter, one delicious meal at a time.
The beauty of this dish lies in its versatility and forgiving nature. Whether you’re a beginner cook following these instructions for the first time, or an experienced home chef adding this to your repertoire, you’ll find that baked ziti delivers impressive results without demanding perfection.
Think about what this recipe offers you: a meal that feeds a crowd without breaking the bank, a dish that tastes even better the next day, and a kitchen filled with aromas that make everyone drift toward the dining table with smiles on their faces. It’s comfort food at its finest—the kind that satisfies both stomach and soul.
Once you’ve mastered the basic technique, the variations become endless. Swap proteins, add vegetables, adjust spice levels, or experiment with different cheese combinations. Each time you make it, you’re not just following a recipe—you’re creating a tradition that might get passed down through your own family.
Your Next Steps: Time to Create Something Amazing
Don’t wait for a special occasion to make this happen. Transform tonight into something memorable by filling your home with the irresistible aroma of this classic Italian-American comfort food. Your family will remember the meal, the conversation around the table, and the love you put into creating something from scratch.
Ready to get started?
Grab your ingredients, preheat that oven to 375°F, and prepare for the compliments that are definitely coming your way. Take a photo of your finished masterpiece and share it with friends who ask for the recipe (and they will ask).
Remember: cooking should be joyful, not stressful. If your layers aren’t perfect or your cheese doesn’t brown exactly like the pictures, it doesn’t matter. What matters is that you made something delicious with your own hands, and that’s always something to be proud of.
Now go make something amazing. Your kitchen is waiting, and that perfect, cheesy, bubbling baked ziti isn’t going to make itself. Trust the process, enjoy the journey, and savor every single bite. When you take that first forkful and see the smiles around your table, you’ll understand why this recipe has stood the test of time.
Share your success! After you’ve made this baked ziti recipe, come back and tell us how it turned out. What variations did you try? Did your kids ask for seconds? Tag your photos and inspire others to gather their families for a home-cooked meal. Because at the end of the day, that’s what great food is really about—bringing people together.


No comment yet, add your voice below!